Before you restore a database, ensure that you have properly prepared for the restore process. For more information about preparing for the restore process, see "Preparing to Recover Exchange 2000 Databases".
To recover an Exchange 2000 database
- To ensure that the Microsoft Exchange Information Store service is running, click Start, click Run, and then type services.msc. In Services, if Started does not display as the Status of the Microsoft Exchange Information Store services object, right-click Microsoft Exchange Information Store, and then click Start.
- Determine which Exchange databases you want to restore.
- Ensure that the databases you want to restore are dismounted. For more information about how to dismount databases, see "Dismounting the Exchange Databases That You are Restoring" earlier in this chapter.
- Configure the databases so that the restore process overwrites them. For more information about how to configure these databases, see "Configuring the Exchange Databases so the Restore Process Overwrites Them".
- Backup the database files for the databases you want to restore by copying or moving these files to different folders. For more information about how to copy or move these files, see "Copying or Moving the Existing Versions of the Database Files That You are Restoring" earlier in this chapter.
- Ensure that the display names of the storage groups and databases you are restoring match the display names in Exchange System Manager. For more information about how to ensure these display names match, see "Ensuring That the Storage Group and Database Display Names Match the Names of the Files You are Restoring" .
- Click Start, point to Programs, point to Accessories, point to System Tools, and then click Backup.
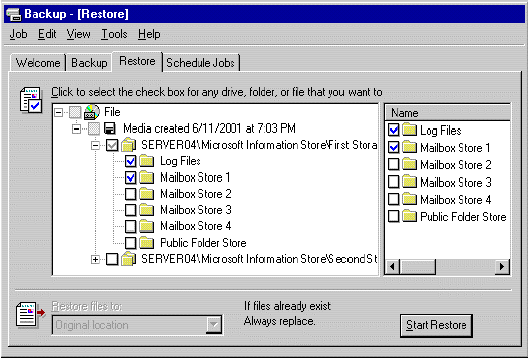
- Click the Restore tab, and then, in the console tree, click the backup media that you want to restore. If the correct media does not display under File, you may need to rebuild the catalog. For more information about how to rebuild the catalog, see "Rebuilding a Catalog for a Restore".
- Click the boxes next to the storage groups and databases you want to restore. For example, if you want to restore an entire storage group, click the check box next to the Server Name\Microsoft Information Store\ object that represents the storage group you want to restore (below). If you want to restore just one database in a storage group, select only the check box next to the database you want to restore.
Note Selecting or clearing the Log Files check box does not affect the restore process. Exchange automatically detects whether log files are to be restored based on the type of backup you are restoring.

Selecting the storage groups and databases you want to restore
- In the Restore files to list, select the location to where you want the files restored. By default, the location specified is Original location.
- Click Start Restore.
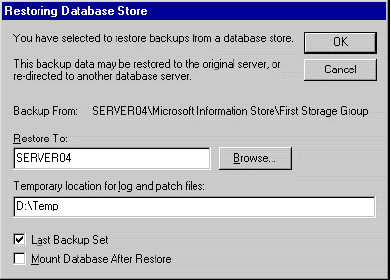
- In the Restoring Database Store dialog box, in the Restore to box, specify to which server running Exchange 2000 you want the databases restored .

The Restoring Database Store dialog box
- In the Temporary location for log and patch files box, specify a directory to store log and patch files during the restore process. Ensure that there is enough space in the directory to store the files (the disk space requirement is about 10 MB more than the size of the transaction log files and patch files that are being restored).
Important If the directory that you specify in the Temporary location for log and patch files box is the same as the original location of the database or log files, the restore process will fail.
- If you are restoring a backup that is the only one in its set (for example, if you are restoring a Normal backup that does not have any Differential or Incremental backups), select the Last Backup Set check box. If you are restoring a backup that is part of a series of Normal, Differential, or Incremental backups, leave this check box cleared until you restore the final Incremental or Differential backup in the series. The restore process does not initiate hard recovery to play back the log files and patch files to the database being restored until this box is selected.
Important If you forget to select the Last Backup Set check box, you can use ESEUTIL /CC after the restore is complete. To run ESEUTIL /CC, from a command prompt in the folder where the Restore.env file is located, type eseutil /cc. Do not use any other parameters. ESEUTIL performs the same function as the Last Backup Set check box. Use all other /CC switches with extreme caution.
- If this is the last backup set you are restoring, select the Mount Database After Restore check box to mount the Exchange databases at the end of the restore process, and then click OK.
Note If there are other tasks that you want to perform that require databases to be dismounted (such as applying an Exchange service pack during the "rebuild the server" recovery method), do not select the Mount Database After Restore check box.
- If Backup prompts you for the location of the backup file to use in the restore, select the correct backup name, and then click OK. For more information about how to select the correct backup file name, see "Selecting the Backup File Name".
- After the restore process is complete, the Restore Progress dialog box displays. Ensure that the restore process was successful. For more information about how to check the success of the restore process, see "Checking the Success of a Completed Restore Job".
- After you have verified that the restore process was successful, in Restore Progress, click Close. You are prompted to restart your computer to complete the restore. Click Yes to restart.
- Perform any further steps required by your disaster recovery process, such as installing Exchange service packs.
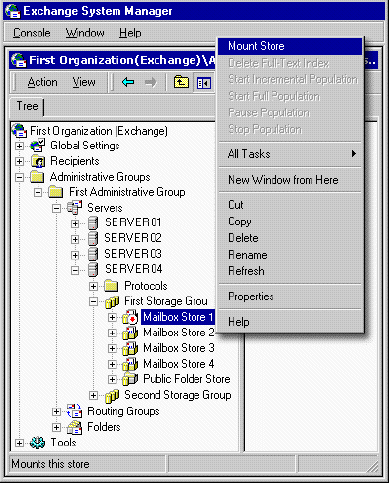
- If you did not select the Mount Database After Restore check box in the Restoring Database Store dialog box (see Step 15), mount the databases manually. For more information about how to mount databases, see the procedures in "Dismounting the Exchange Databases that You are Restoring".However, in Step 3 of that procedure, click Mount Store instead of Dismount Store.

Mounting the databases
The information in this article applies to:
- Microsoft Exchange Server 2003 Enterprise Edition
- Microsoft Exchange Server 2003 Standard Edition
- Microsoft Windows Small Business Server 2003, Premium Edition
- Microsoft Windows Small Business Server 2003, Standard Edition
- Microsoft Exchange 2000 Server


