You can use Backup to restore the Key Management Service database (as with the Restoration of the Certification Authority). Alternatively, you can manually restore the Key Management Service database (Kmsmdb.edb file) if you have a backup of that file. The Kmsmdb.edb file is in the Key Management Service folder under the folder where you installed Exchange.
Important To restore the Key Management Service database, you must either know what the password is or have a backup of the password file (Kmserver.pwd). The password you need depends on your Key Management Service configuration. If you do not know the password, finish recovering your server running Exchange 2000 server, remove Key Management Service using Exchange 2000 Setup, and then reinstall Key Management Service to create a new password. However, you cannot access the previous database's contents after reinstalling the service and creating a new password. For information about passwords required to start Key Management Service, see "Preserving the Password Used to Start Key Management Service".
To restore the Key Management Service database
- . Click Start, point to Programs, point to Microsoft Exchange, and then click System Manager.
- In Exchange System Manager, in the console tree, expand Administrative Groups, and then expand the administrative group that contains the Key Manager node you want to open.
- Click Advanced Security, and then, in the details pane, click Key Manager.
- Click the Stop Service button on the toolbar. Keep Exchange System Manager open.

The Key Manager object in Exchange System Manager
- In Windows Explorer, move or delete any files that exist in the kmsdata folder on the server running Key Management Service. The original Key Management Service database files cannot be restored if these files are present. To move or delete these files:
- On the server running Key Management Service, click Start, point to Programs, point to Accessories, and then click Windows Explorer.
- In Windows Explorer, create a temporary folder to hold the files that you want to move or copy.
- On the Tools menu, click Folder Options.
- On the View tab, under Advanced Settings, ensure that the Hide file extensions for known file types check box is cleared, and then click OK.
- In Windows Explorer, in the console tree, go to the kmsdata folder. By default, the location for this folder is :\Program Files\Exchsrvr\kmsdata, where is the location where you installed Windows 2000 Server.
- Select all existing .edb, .log, or .chk files from the srsdata folder. From the Edit menu, click Move To Folder, and then specify a temporary folder. Alternatively, if you want to delete these files, right-click the files, and then click Delete. The advantage to archiving these files is that the set of files may be helpful if your SRS database restore job is unsuccessful.
- In Exchange System Manager, on the toolbar, click the Start Service button.

The Key Manager object in Exchange System Manager
- Click Start, point to Programs, point to Accessories, point to System Tools, and then click Backup.
- Click the Restore tab, and then, in the console tree, click the backup media you want to restore (see below). If the correct media does not display under File, you may need to rebuild the catalog. For more information about how to rebuild the catalog, see "Rebuilding a Catalog for a Restore".
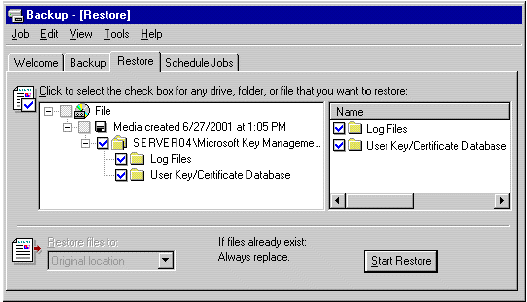
Restoring Key Management Service
- Click the \Microsoft Key Management Service\Key Management Service check box, where is the name of your Exchange 2000 server that is running Key Management Service.
- Under Restore files to, select the location to where you want the file restored. By default, the location specified is Original Location.
- Click Start Restore.
- In the Restoring Database Store dialog box, in the Restore to box, specify to which server running Exchange 2000 you want the databases restored. This must be the server that is running Key Management Service .

The Restoring Database Store dialog box
- In the Temporary location for log and patch files box, specify a directory to store log and patch files during the restore process.
Important If the directory that you specify in the Temporary location for log and patch files box is the same as the original location of the database or log files, the restore process will fail.
- If you are restoring a backup that is the only one in its set (for example, if you are restoring a Normal backup that does not have any Differential or Incremental backups), select the Last Backup Set check box. If you are restoring a backup that is part of a series of Normal, Differential, or Incremental backups, leave this check box cleared until you restore the final Incremental or Differential backup in the series. The restore process does not play back the Key Management Service log files and patch files to the database being restored until this box is selected.
Note The Mount Database After Restore check box does not affect your Key Management Service database restore. That control is applicable only to mailbox and public folder store restoration procedures.
- If Backup prompts you for the location of the backup file to use in the restore, select the correct backup file name, and then click OK. For more information about how to select the correct backup file name, see "Selecting the Backup File Name".
- After the restore process is complete, the Restore Progress dialog box displays. Ensure that the restore process was successful. For more information about how to check the success of the restore process, see "Checking the Success of a Completed Restore Job".
- After you verify that the Key Management Service database backups are successfully restored, in the Restore Progress dialog box, click Close. You are then prompted to restart your computer to complete the restore. Click Yes to restart.
- Perform any further steps required by your disaster recovery process, such as installing Exchange service packs.
The information in this article applies to:
- Microsoft Exchange Server 2003 Enterprise Edition
- Microsoft Exchange Server 2003 Standard Edition
- Microsoft Windows Small Business Server 2003, Premium Edition
- Microsoft Windows Small Business Server 2003, Standard Edition
- Microsoft Exchange 2000 Server