Exchange 2000 includes an optional feature called full-text indexing (also known as content indexing). Full-text indexing allows your users to perform full-text searches across documents and attachments within messages. Full-text indexes are not stored with your Exchange databases. By default, full-text indexes are located in the Program Files\Exchsrvr\ExchangeServer Server Name\Projects directory and are managed by the Microsoft Search service.
To repair full-text indexes that are corrupt or not synchronised with your Exchange databases, you must re-index the data on your Exchange databases. If Microsoft Search is damaged, follow the procedure in "Restoring Microsoft Search" to restore Microsoft Search as part of your full-text indexing repair.
Important Tere is no supported method of effectively performing full-text index backups. To restore your full-text indexes after a disaster, you must re-index your full-text indexes.
Re-Indexing the Data on Your Exchange Databases
Re-indexing the data on your Exchange databases requires that you remove full-text indexing information and re-create full-text indexes. To delete the damaged indexes and re-create them, use the following procedure.
Warning This section contains information about editing the registry. Before you edit the registry, make sure you understand how to restore it if a problem occurs. For information about restoring the registry, see the "Restore the Registry" Help topic in Regedit.exe or Regedt32.exe.
To remove full-text indexing information
- Click Start, point to Programs, point to Microsoft Exchange, and then click System Manager.
- In Exchange System Manager, in the console tree, expand Administrative Groups, and then expand the administrative group that contains the server that has storage groups of the full-text indexes you want to remove.
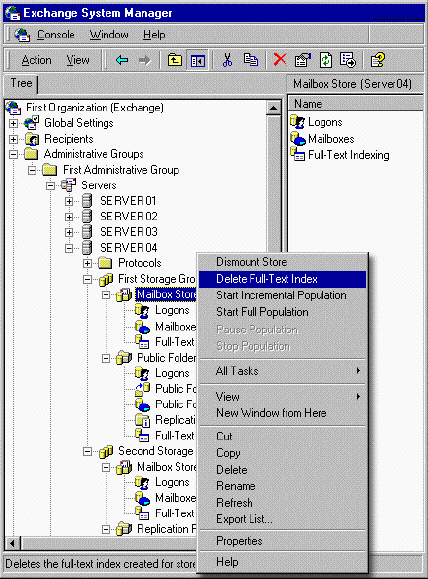
- Under the server that has storage groups that contain the mailbox stores or public stores for which you want to remove full-text indexes, right-click each storage group, and then click Delete Full-Text Index for each storage group, see figure below.
- Close Exchange System Manager.
- Click Start, click Run, type Regedit, and then click OK.
- In Registry Editor, locate the following key:
HKEY_LOCAL_MACHINE \SOFTWARE\Microsoft\Search\1.0\Databases
- Under Databases, click ExchangeServer, where is the server from which you want to delete full-text indexes.
- In the details pane, view the following string values: FileName and LogPath. FileName points to the property store used by full-text indexing. LogPath points to the folder that contains the log files and checkpoint files for the property store.
Deleting full-text indexes
- Next to Log Path, under Data, locate the folder where the property store and log files are kept. Record the path to this folder, as you need it for the next step. By default, the folder is:
C:\Program Files\Exchsrvr\ExchangeServer_ServerName
C is the drive where Microsoft Exchange 2000 was installed and ServerName is the name of your server running Exchange.
- In Windows Explorer, or from a command prompt, go to the folder that you recorded in the previous step.
Caution Because you are going to delete files from this folder, consider copying the contents of this folder to a safe location to save the folder information in the event an error occurs while deleting the files.
- Under the ExchangeServer_ folder, delete the contents of the Projects and GatherLogs subfolders. Do not delete the Projects and GatherLogs folders. View the contents of the Projects and GatherLogs folders to ensure the required files are deleted.
12. Close Windows Explorer or the command prompt.
To re-create full-text indexes
- Click Start, point to Programs, point to Microsoft Exchange, and then click System Manager.
- In Exchange System Manager, in the console tree, expand Administrative Groups, and then expand the administrative group that contains the server that has storage groups of the full-text indexes you want to create.
- Under the server that has storage groups that contain the mailbox stores or public stores for which you want to re-create full-text indexes, right-click each mailbox store or public folder store, and then click Create Full-Text Index for each store.
- For each mailbox store or public folder store in which you performed Step 3 of this procedure, right-click each store again, and then click Start Full Population.
- For each index that you want to make available for full-text index searching, right-click each mailbox store or public folder store, click Properties, click Full-Text Indexing, and then select the This index is currently available for searching by clients check box.
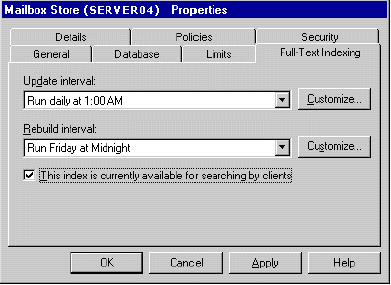
Enabling the indexes for searching
- For each index that you want to customise the update and rebuild intervals, click Customise, and then make the appropriate changes.
Note Exchange 2000 Service Pack 2 (SP2) and future releases do not have the ability to specify the rebuild interval.
The information in this article applies to:
- Microsoft Exchange Server 2003 Enterprise Edition
- Microsoft Exchange Server 2003 Standard Edition
- Microsoft Windows Small Business Server 2003, Premium Edition
- Microsoft Windows Small Business Server 2003, Standard Edition
- Microsoft Exchange 2000 Server