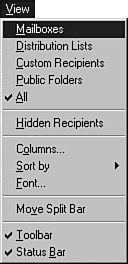
- Mailboxes, Distribution Lists, Custom Recipients, Public Folders, and All
These menu items all filter the view for the list of Exchange recipients. A check mark appears next to the menu item that you are currently viewing. To view only a particular sub-set of the recipients, select an option other than the "all" option.
- Hidden Recipients - This menu item is a filter that adds hidden recipients to any of the preceding viewing filters. Hidden recipients are recipients not seen in the GAL.
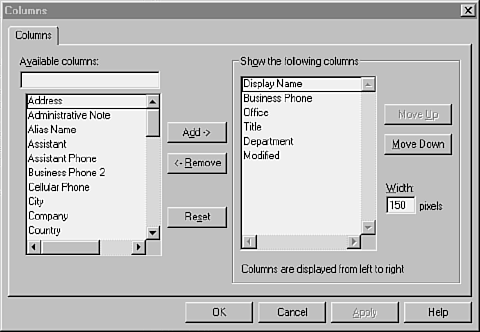
- Columns - This menu item changes the columns of information that appear in the Administrator program's user interface. This item is available only while you are viewing a recipient container. After you click on the Columns button, the dialog box shown below will appear.

The Columns dialog box allows you to specify what object attributes are displayed.
The left side of the dialog box shows all Exchange recipient the attributes. The right column shows which ones are displayed in the administrator program.
To configure the displayed columns, follow these steps:
- From the Available Columns list, select any additional attributes that you want to display; then click Add.
- From the Show the Following Cloumns list, select any attribute that you do not want to display; then click Remove.
- To change the order in which columns are displayed, select an attribute from the right list and then click Move Up or Move Down.
Columns are displayed from left to right, even though you set their order from top to bottom.
A better way to set column widths is to use your mouse. In the Administrator program's user interface, drag the mouse pointer over the dividing lines between each attribute column. When the pointer changes to two a double-headed arrow, click and drag that column to the desired width.
- To change the width of a particular column, select its attribute and edit the number pixels it takes up on the Administrator program user interface window.
- Click Apply to view your changes immediately on the background window.
- Click OK to finalize your changes.
- Sort By - This menu item enables you to organize what you see in the Administrator program user interface. You can sort any Microsoft Exchange object, including recipients.
When you choose this menu item, a sub-menu appears, with two options:
- Sort by Display Name places the objects in alphabetical order by display name.
- Sort by Last Modified Date places the objects in order of the dates (and times) when they were last modified.
Microsoft Exchange remembers every view setting in for each object list in the Administrator program user interface. At the same time, you can choose to view your global address list sorted by display name and your connection sorted by date last modified, and you can have your local address list filtered to show only public folders.
- Font - This menu item will open a Font dialog box which displays your currently installed system fonts. Select a font and then click OK to return to the Administrator program.
- Move Splitbar - Another way to re-divide the administrator program user interface is to drag your mouse over the line, then click and drag it to the desired position.
This menu item selects the dividing line between the Exchange site hierarchy and the objects corresponding to the hierarchy in the Administrator program. You can now adjust the window's partition. Use the mouse to drag the line to the desired position; then click to set the line.
- Status Bar - This menu item turns the status bar on and off. The status bar displays useful help messages and shows the number of objects in the selected container.


