The Tools menu provides access to various administrative utilities.
- Directory Import - The Directory Import option allows you to read comma-delimited files and use them to create or modify recipients. These files may contain MS Mail recipients, Exchange recipients, or some other foreign e-mail system recipients.
The files will need to be created either by using the Exchange migration tools or by using Directory export tools in the respective e-mail systems. The files contain recipient name and email address information to be used in Microsoft Exchange.
Directory Import Features:
The following is a list of the features you can perform using the Exchange directory import function.
- Import Directory information from another e-mail system or import.
- Add or change personal information for to existing mailboxes and other recipients.
- Add members (in bulk) to distribution lists
Microsoft Exchange includes some useful migration tools that provide similar functionality and are simpler to use. See chapters 7 and 8 for more information on migrating from other mail systems and use of the migration tools.
- Directory Export - This menu option creates text files of Microsoft Exchange directory information that can be imported into other messaging systems.
Extract Windows NT Account List
This menu item selectively copies data from the Windows NT account list of a trusted domain. Files are stored in the CSV file format, which you can used with the Directory Import command to add and create Exchange recipients.
- Extract NetWare Account List - This menu item selectively copies user data from a Novell Netware account list. Files are stored in the CSV file format, which you can then use to import into Exchange to create Exchange recipients and Windows NT user accounts.
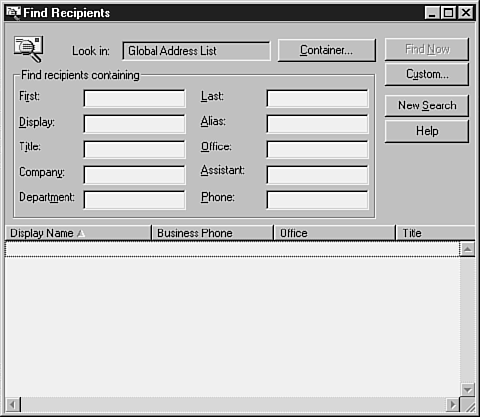
- Find Recipients - This menu item allows you to search for recipients anywhere in your organization, based on a variety of criteria. When you choose Find Recipients, the dialog box shown below appears.

The Find Recipients dialog box allows you to search for a recipient by any attribute.
The top half of this dialog box allows you to specify search criteria; the bottom half displays the result of your searches.
To search for recipients, follow these steps:
- The Look In box displays the recipient container in which a search will be executed. Click the Container button to display a global list of Exchange recipient containers in your organization; select one and then click OK.
- By default, the Look In box shows the primary recipients container of the server you are connected to.
- In the Find Recipients Containing section, enter any distinguishing search criteria for the recipient.
- To search by custom attributes, click Custom, a dialog box opens up and you can enter your search parameters; then click OK to return to the Find Recipients dialog box.
- Click Find Now when you finish entering search parameters. All matches of your search criteria are displayed at the bottom of the Find Recipients dialog box.
- Double-click any listed recipient to view its Exchange properties.
- Click New Search to clear all search parameters.
- Click Cancel to close the dialog box to return to the Administrator program.
- Move Mailbox - This menu item transfers a selected recipient to a different sever within the same Microsoft Exchange site. When you choose Move Mailbox, the dialog box shown below appears.

- Transfer a mailbox to another server in the site. - Select the Exchange server to which you want to move this recipient, and click OK. The mailbox is transferred to the new server's private information store.
This menu is unavailable unless you select a recipient from the recipient's container in the Exchange site hierarchy.
- Clean Mailbox - This menu item, Clean Mailbox, deletes messages in a particular user's mailbox, based on several criteria. This command can be useful when an unreasonable number of messages have piled up in a specific mailbox.
Select the criteria that you want to use to delete messages in this mailbox. A message must meet all the selected criteria to be deleted. The criteria are:
- Age. All mail older (in days) than the number in the All Messages Older Than (Days) will be deleted. All mail greater in size (in kilobytes) than the number in the All Messages Greater Than (K) box will be deleted.
- Sensitivity. All messages have a sensitivity attribute. You can select up to four sensitivity levels. All messages that have the selected sensitivity levels will be deleted.
- Read Items. This Read Items option is the read or unread status of the messages. You must select the status of messages to be deleted: read, unread, or both.
- Delete Items Immediately. This item permanently removes messages from the mailbox.
- Move Items to the Deleted Items Folder. This item places the selected messages in that user's Deleted Items folder in the Exchange Client.
- Start Monitor - This menu item starts the selected server monitor or link monitor. This option is unavailable if a monitor is not selected.
- Track Message - This option launches the Message Tracking Center, which is a tool for following the delivery of messages through an organization.
- Forms Administrator - This menu item displays the Organization Forms Library Administrator, which allows you to manage the various forms created using the forms designer tool in the Exchange client software to meet specific messaging needs.
- Save Connections on Exit - This menu item is a toggle that can save information about your current server connections when you quit the Administrator program. The next time you open the Administrator program, it tries to reestablish the connections to those severs.
- Save Connections Now - The moment that you select this option, Exchange saves current Exchange Server connections. The next time you open the Administrator program, it tries to reestablish the connections to those servers.
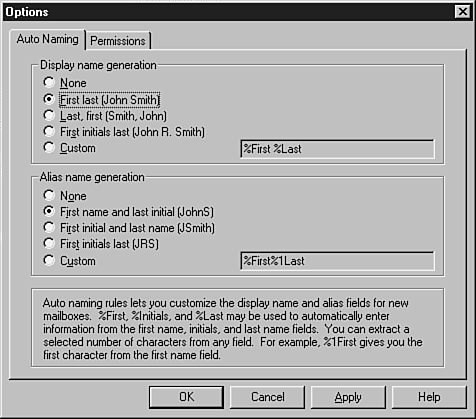
- Options - This menu item displays two property pages that allow you to set options for Exchange mailboxes and other recipients. The property pages are:
Auto Naming. Allows you to define a method for Display Name Generation and
- Alias Name Generation.
- Permissions. Allows you to set a default Windows NT domain where new mailbox accounts are to be created and in addition to other object related permissions.
To set Auto Naming options, follow these steps:
- Click the Auto Naming tab in the Options dialog box.

The Auto Naming tab helps you generate mailbox display names.
- The Display Menu Generation section allows you to define how the Administrator program generates display names when the email system administrator is typing or importing new Exchange mailboxes. Choose None to always enter display names manually. Choose Custom to create a specialized entry type or template.
- The Alias Name Generation section allows you to define how the Administrator program generates alias names when the email system administrator is typing or importing new Exchange mailboxes. Choose None to always enter alias names manually. Choose Custom to create a specialized entry type.
- Click Apply to set these properties and continue with the other properties.
- When you finish making settings, click OK to return to the Administrator program.
To set Permissions options, follow these steps:
- Click the Permissions tab in the Options dialog box.
- Select the default Windows NT domain for all new mailboxes from the pull-down menu.
- Choose Show Permissions Page for All Objects if you want the permissions to be displayed in all the property pages of the objects that have them. By default, this box is not checked, and the permissions pages are hidden.
- Choose Display Rights for Roles on Permissions Page to display the list of rights on the permissions page. Roles are sets of rights that define what type of access, and how much, a user or group has.
- Choose Delete Primary Windows NT Account When Deleting Mailbox to delete the associated Windows NT account along with a mailbox. This box is not checked by default.
Proceed with caution; a deleted Windows NT user can no longer log into the domain for any reason.
- Choose Try to Find Matching Windows NT Account When Creating Mailbox to have the Administrator program search the Windows NT user list to find the matching account name. This box is checked by default.
- Click Apply to set these properties and continue with the other properties on the permissions tab.
- When you finish making settings, click OK to return to the Administrator program.


