Legal Information
PC Knowledge Base - Setting Outbound Retry Intervals, Delay Notification, and Expiration Time-Out

Good Knowledge Is Good2Use

Once a connection has been established and the receiving computer has acknowledged that it's ready to receive the data transfer, Exchange Server attempts to deliver messages queued for delivery to the computer. If a message can't be delivered on the first attempt, Exchange Server tries to send the message again after a specified time. Exchange Server keeps trying to send the message at the intervals you've specified until the expiration time-out is reached. When the time limit is reached, the message is returned to the sender with a nondelivery report. The default expiration time-out is two days.

After each failed attempt to deliver a message, Exchange Server generates a delay notification and queues it for delivery to the user who sent the message. Notification doesn't occur immediately after failure. Instead, Exchange Server sends the delay notification message only after the notification delay interval and then only if the message hasn't already been delivered. The default delay notification is 12 hours.

The way in which Exchange Server handles delay notification and expiration time-out values depends on whether the message originated within or outside the organisation. Exchange Server handles messages that originate within the organisation using the Local delay notification and expiration time-out values. Exchange Server handles messages that originate outside the organisation using the Outbound delay notification and expiration time-out values.

Tip A copy of the failed message and the nondelivery report can be sent to your organisation's postmaster or other administrator's inbox. To do this, follow the procedure outlined in "Managing Message Delivery for SMTP and the Exchange Server Organisation."

You can view or change the retry interval, delay notification, and expiration time-out by completing the following steps:
  1. Start System Manager. If administrative groups are enabled, expand the administrative group in which the server you want to use is located.
  2. In the console tree, navigate to the Protocols container. Expand Servers, expand the server you want to work with, and then expand Protocols.
  3. In the console tree, expand SMTP. Right-click the virtual server that you want to work with, and then select Properties. The default SMTP virtual server controls message delivery for the default domain.
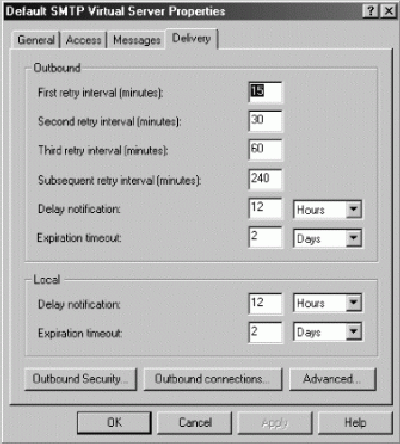
  4. Click the Delivery tab, as shown in Figure 13-6, and then use the following options to set the retry values:
    • First Retry Interval (Minutes) Sets the amount of time to wait after the first delivery attempt. The default is 15 minutes.
    • Second Retry Interval (Minutes) Sets the amount of time to wait after the second delivery attempt. The default is 30 minutes after the first retry interval.
    • Third Retry Interval (Minutes) Sets the amount of time to wait after the third delivery attempt. The default is 60 minutes after the second retry interval.
    • Subsequent Retry Interval (Minutes) Sets the amount of time to wait after the fourth and subsequent delivery attempts. The default is 240 minutes.

    Use the options in the Delivery tab to control message delivery in the organisation.
  5. Set the Outbound delay notification and expiration time-out values using the Delay Notification and Expiration Timeout fields on the Outbound panel. You can set these values in minutes, hours, or days.
  6. Set the Local delay notification and expiration time-out values using the Delay Notification and Expiration Timeout fields on the Local panel. You can set these values in minutes, hours, or days.
  7. Click OK.


Search Knowledge Base Feedback
If you like our web site refer a friend.
Your friends name.
Your friends email address.
Your Name
Your Email Address


© Copyright 1998-1999 GOOD2USE