Legal Information
PC Knowledge Base - Microsoft ISA Server 2000 - Configuring a Separate Exchange Server

Good Knowledge Is Good2Use

This section describes how to configure message screening when the Exchange Server and ISA Server are located on different computers. In this case, two configurations are possible, as illustrated in the figures below.

In the configuration illustrated below (Scenario 1), the message screener is installed on the server running Internet Information Services (IIS). The advantage of this configuration is that the Exchange Server is further isolated from the network edge. In this scenario, the message screener screens only incoming messages.
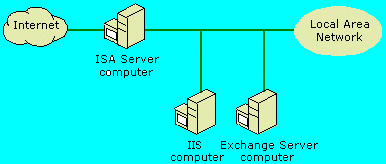
In the configuration illustrated below (Scenario 2), the message screener screens all messages, both incoming and outgoing. It is possible to configure the Exchange Server computer so that only incoming messages are screened.
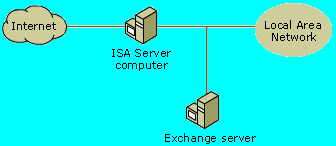
The ISA Server and the Exchange Server are configured similarly for both these scenarios. The following sections describe how to configure the computers.

Configure the Exchange Server

In scenario 2 (ISA ServerExchange Server) you must create a virtual SMTP Server on the Exchange Server computer. The process is described below.
To install the message screener on a virtual SMTP Server (Scenario 2 only)

Note: Install the message screener only after you set up the virtual SMTP server. The message screener is installed only on the first virtual server (in the list), as listed in the Exchange System Manager.

Configure the Virtual SMTP Server

In this step, you configure the virtual SMTP Server. In Scenario 1, the virtual SMTP Server is located on the IIS computer. In Scenario 2, the virtual SMTP Server is located on the Exchange Server computer.

    To configure the virtual SMTP Server
  1. Install the ISA Server Message screener as described in the steps below.
    Note: If you have configured your network as described in the To install the message screener on a virtual SMTP Server (Scenario 2 only) section above, then you can skip this step.
  2. On the computer running Exchange Server, run the ISA Server setup.
  3. In ISA Server setup, click Continue, type the CD key, select the appropriate installation folder, and then select Custom Installation.
  4. In the Options box, verify that the ISA Services and Administration tools options are not selected.
  5. Highlight the Add-in services option and then click Change Option.
  6. Select only the Message Screener option and then click OK. Then, finish the setup process, selecting the default options.
  7. If you are running ISA Server Standard Edition with configuration Scenario 2 (ISA Server-Exchange Server), or if you are running ISA Server Enterprise Edition as a standalone server, then run the SMTPCred.exe tool. When you run the tool, enter appropriate credentials and the name of the ISA Server computer. The user account required for SMTPCred.exe does not need any special rights, but it does need to exist in the domain. SMTPCred.exe is available on the ISA Server CD in the .\isa\i386 folder.

Configure the ISA Server

On the ISA Server computer, you must allow SMTP Server publishing, by using the ISA Server Mail Server Security Wizard to publish the virtual SMTP Server. In Scenario 1, you will publish the virtual SMTP Server located on the IIS computer. In Scenario 2, you will publish the virtual SMTP Server located on the Exchange Server computer.
To publish the virtual SMTP Server

  1. In the console tree of ISA Server, click Internet Security and Acceleration Server, click Servers and Arrays, click the applicable array, click Publishing, right-click Server Publishing Rules, and then click Secure Mail Server.
  2. Click Next.
  3. On Mail Services Selection, select the protocols to publish and then click Next.
  4. On ISA Server's External IP Address, type an external IP address on the ISA Server computer and then click Next.
  5. On Internal Mail Server Address, select At this IP address, and then type the IP address as appropriate (depending on the configuration scenario).
  6. Click Next and then click Finish.


Search Knowledge Base Feedback
If you like our web site refer a friend.
Your friends name.
Your friends email address.
Your Name
Your Email Address


© Copyright 1998-1999 GOOD2USE