Legal Information
GOOD2USE Knowledge Network Sharing Broadband Hardware connections

Good Knowledge Is Good2Use

  1. Install the network card.
    Each computer connected to the local area network has to have one Ethernet card.
    1. Switch off the computer. Open the computer case. Plug in the network card into the PCI or ISA slot.
    2. Switch on the computer and install the drivers for the network card.
  2. Connect the broadband modem (ADSL or Cable modem)

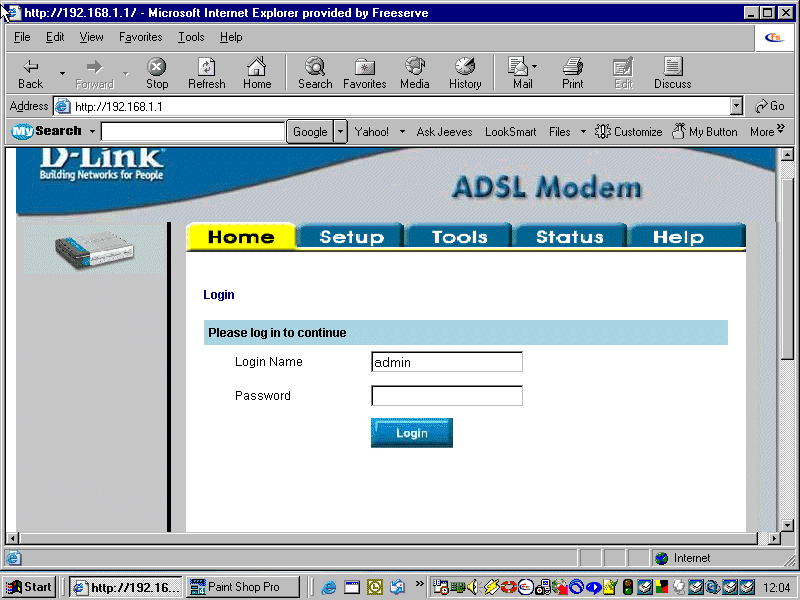
    In order to configure the modem/router combination first configure the modem. This is done by connecting the modem to the NIC and then configuring through Internet Explrorer.
    In IE

    1. Click on Tools and then Internet Options
    2. Click on the Connections tab and select Never dial a connection
    3. Click Lan Settings and tick the Automatically detect settings box
    4. Click ok and enter 192.168.1.1 into the IE's URL address. In the case of a USB connected box this may well be 192.168.1.2 (TalkTalk). This will connect you to the modem as a server and allow configuration to take place. The default userid and password for logon purposes is admin and admin for most routers or modem/routers. This includes boxes that are shipped as part of a broadband package from an ISP such as TalkTalk.

      D-Link DSL-300T Modem Login
    5. Then follow the manufacturer's setup instructions


        D-Link DSL-300T Modem Connection Setup
      • The standard connection, where no static IP address is available, is either PPPoA or PPPoE.
      • The login information provided by the ISP is entered into the modem as this will login to the broadband service.

      D-Link DSL-300T Modem Connection DHCP Server

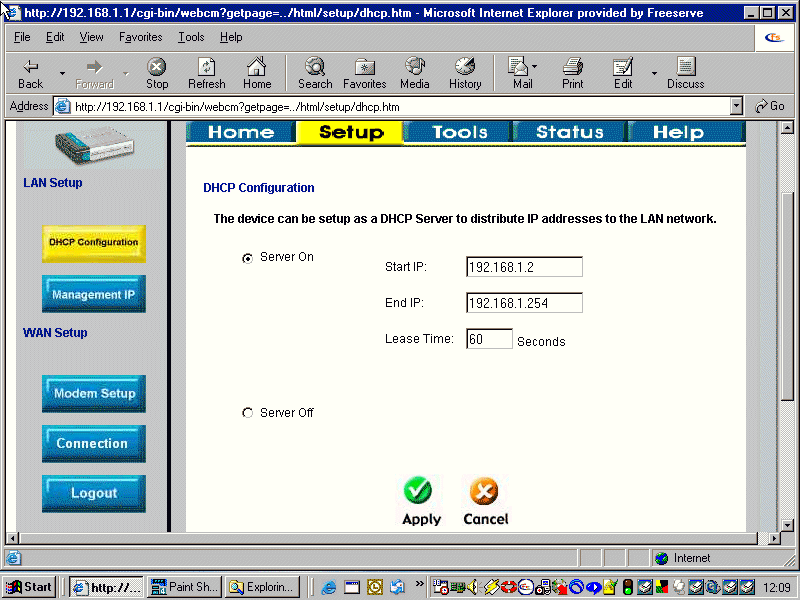
      The modem becomes the DHCP server for the network. So a range of valid addresses needs to be defined. The first posible address after the last valid address will become the IP address for the router, that is 192.168.2.1. The first valid address is the next one after the modem, i.e. 192.168.1.2.

    It is a good idea that, having configured the modem, you test the link with a ping command from a Command prompt.
  3. Connect the Internet BroadBand Router with broadband modem (ADSL Modem or Cable Modem). This involves connecting a router Ethernet port to the NIC and the modem to the router.
    1. Plug in one end of the network cable to the WAN (Internet) port of the Internet BroadBand Router.
    2. Plug in the other end of the network cable to the Ethernet port of the ADSL or Cable modem.
  4. Connect the Internet Broadband Router (Internet BroadBand Router)
    Connect one end of the network cable to the Ethernet card on the computer, the other end of the cable connects to the LAN port of the Internet BroadBand Router. Since the Internet BroadBand Router has five (or eight) ports, you can connect up to five (or eight) computers directly to the unit. Then you do not have to buy a hub to connect these computers since one Internet BroadBand Router functions both as a connection-sharing unit and as a hub.

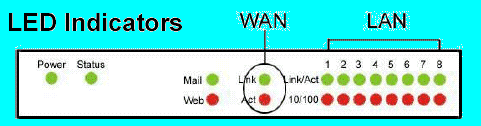
    When the network connection is complete, you can check the connection status and speed by looking at the LAN port and Link LED status. When both LEDs of a port are on, the connection is 100 Mbps (depending on your network card or cable). If only the top LED is lit, your network connection is only 10 Mbps. As long as the Link LED is on, then the connection is normal.
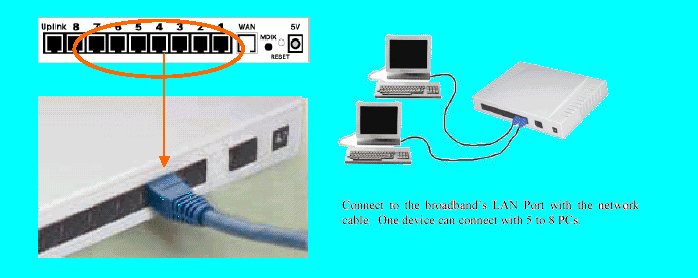
    Connect to the broadband's LAN Port with the network cable. One device can connect with 5 to 8 PCs.

  5. Check the installation.
    The control LEDs of the Internet Broadband Router are clearly visible and the status of the network link can be seen instantly:
    1. With the power source on, once the device is connected to the broadband modem, the Power, Status, and WAN port link LEDs of the Internet BroadBand Router will light up indicating a normal status.
    2. If the WAN Port Link does not light up then press the MDIX button located on the underside of the unit. LED Indicators


Search Knowledge Base Feedback
If you like our web site refer a friend.
Your friends name.
Your friends email address.
Your Name
Your Email Address


© Copyright 1998-1999 GOOD2USE