Legal Information
PC Knowledge Base - Upgrade the Processor

Good Knowledge Is Good2Use

  1. Carefully lift the keyboard up and fold it over. Be sure not to disconnect its cable from the motherboard.

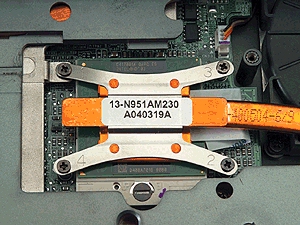
    When removing the processor, make sure you take out the processor's heat-sink screws in the order they're numbered.
  2. Pull out the old processor (it's the one in a socket) and drop in the new one, being certain the pins on the processor match up with the holes in the socket. Remove the two recessed screws - roughly in the middle of the back. They're marked with a K on the M6000N.) These secure the keyboard, and once they're out, you'll be able to lift it and access the motherboard. You may need a pair of needle-nose pliers to remove the screws completely.
  3. Find the motherboard
    1. Turn the laptop right side up again, open the cover, and slide a small, flathead screwdriver under the seam on each side of the plastic frame surrounding the keyboard.
    2. Carefully slip your fingertips under the side of the keyboard and gently run your hand along the top until it comes free. Be careful not to disconnect the keyboard data cable from the motherboard.
    3. Fold the keyboard over, facedown on the touch pad, then detach the plastic control panel above the keyboard by removing two screws.

      Tip: Before you touch anything inside, ground yourself by touching a piece of metal or wearing a grounding strap on your wrist.
  4. Locate the processor
    You can now see the copper fan and the heat-sink assemblies. The corners of the heat sink are numbered 1 through 4. Remove (and later replace) the screws in this numbered order. This helps keep even pressure across the chip's surface to avoid damage. You should now be able to wiggle the heat-sink assembly out of position and remove it.

    If you can't, carefully pry it up using a flathead screwdriver.
  5. Pop in your new CPU

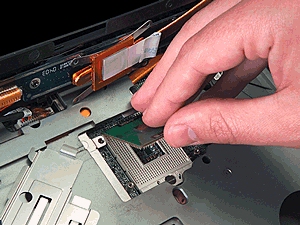
    You now have a clear view of the internal memory slot, the chipset, and the processor. The processor is the one in a socket. With a flathead screwdriver, turn the socket's lock 180 degrees anti-clockwise (toward the 'unlock' symbol) to unlock the chip.
    Remove the old CPU and insert your new one, being careful to keep the notched corner of the CPU's underside with its missing pin aligned with the corresponding corner of the socket. Another way to know you're doing it right is to match the triangle on the socket with the triangle on the CPU.
    The CPU should rest flat in the socket, allowing you to turn the socket's lock screw clockwise to lock the chip in place.

    Note: Most Pentium M-based laptops are Dothan compatible but may require a BIOS upgrade from your motherboard's maker to facilitate regular operation. In some cases, an OEM or a reseller provides such support.

  6. Close everything up
  7. Reverse your steps to reassemble the CPU subsystem, taking care to keep the fan's power cable under the CPU's heat pipe.


Search Knowledge Base Feedback
If you like our web site refer a friend.
Your friends name.
Your friends email address.
Your Name
Your Email Address


© Copyright 1998-1999 GOOD2USE